

Local Database Settings #
Historical data downloaded from a data-feed are always saved in a local database. This allows you to significantly increase the performance of data loading and calculation when opening/refreshing the chart.
Access Local Database Settings #
You can access Local Database Settings from Overcharts main window > Instruments menu > Local Database Settings
Database Size #
Every instrument has its own database. You can define a database default maximum size (in gigabytes). Default maximum size is the size applied by default to each single database.
For some instruments you can define a maximum size different from the default one (both larger and smaller). This gives you maximum control over disk space used by each instrument:
- Select Size Tab
- Press Add button
- Select instruments to customize and press OK
- Define new maximum size of database for each added instrument by selecting the size on the relative combo-box in the grid
- Press OK to confirm changes
If the relevant checkbox is checked, you will be notified when database is close to maximum size.
After receiving the notification, you have the following options:
- Increase default maximum size applied to all instruments.
- Increase database size of the single instrument (all other instruments will continue to have the maximum default size).
- Perform a database optimization (see below)
- Do nothing and to stop receiving the warning uncheck the relevant option. In this case, instrument database will keep the maximum size and the oldest data will be deleted to make room for new data.
Database size can also be reduced. In this case, to actually apply the change to database you need to perform a database optimization.
Database Path #
You can change the folder containing all instrument databases at any time.
WARNING! If you are not experienced enough, DO NOT change default path. You may lose all instrument data.
The success of the operation depends on many factors related mainly to your PC, your network and your experience. For this reason we CANNOT absolutely guarantee the success of this operation.
We do not recommend using an external or network hard-disk, unless the connection is absolutely performing in order NOT to reduce the performance in database reading/writing.
To change path follow these steps:
- Select Path Tab
- Press Change Path button and select the new destination folder
- Choose what to do with current database:
- No action (leave old database unchanged for next reuse)
- Move database to the new path
- Delete database (all data will be PERMANENTLY deleted)
- Press OK to confirm changes
- Restart Overcharts
You can restore database default path at any time by pressing the Restore Default button.
Database Monitor #
From Database Monitor window you can monitor the database size of all instruments and highlight, by selecting the relevant checkbox, the databases close to maximum size.
You can choose to optimize the highlighted databases by pressing Optimization Center button, or change database maximum size by pressing Database Settings button.
Access Database Monitor #
You can access Database Monitor from Overcharts main window > Instruments menu > Database Monitor
Database Optimization #
Database optimization compacts instrument database allowing you to recover disk space and increase database capacity.
Access Database Optimization #
You can access Database Optimization from Overcharts main window > Instruments menu > Database Optimization
To optimize the database of a specific instrument:
1) From Overcharts main window > Instruments Tab, select instrument to optimize
2) Right click > Optimize Database
Optimize #
On window open, a database scan of all instruments is automatically performed. Databases that need optimization will be highlighted. Press the Optimize button to perform the optimization.
The process may take a long time depending on database size and PC performance. We recommend you perform the optimization process outside trading hours.
To force the optimization of one or more instruments, even if not necessary:
1) Press Add button and select all instruments to optimize
2) Start optimization by pressing Optimize button
If after optimizing some instruments remain close to the maximum size, consider changing default maximum size (or only the maximum size of instruments involved) from Local Database Settings window.
Back-up Database #
Backup makes a copy of the database containing the instrument historical data by producing a single file (.bak). This file can be imported into the same (or another) Overcharts installation using Restore Database procedure. In other words, backup is the simplest method to copy the historical data of a single instrument from one installation to another and in particular when the second installation uses a different Overcharts account.
Use backup if you want to send a copy of an instrument’s historical data to a friend. You can NOT send your friend directly the original database file present in your installation because it is incompatible with his account! You MUST necessarily use the backup or export the data to a text file.
To back up, follow these steps:
1. Access backup procedure:
- from Overcharts main window > Instruments menu > Back-Up Database
- or to back-up the database of a specific instrument:
1. From Overcharts main window > Instruments Tab, select the instrument to back-up
2. Right click > Back-Up Database
2. In backup window press Add button to select instruments you want to back-up.
3. Set the Path where you want to save backup file(s).
4. Press Back-Up button to start backup.
WARNINGS:
- In Overcharts each instrument has its own database. Therefore backing up x instruments will produce x backup files.
- Each backup file has its own identifying name: Symbol + Connection Short Description + ID + Backup Timestamp + .bak
- If an instrument backup file already exists in the same path, it will be overwritten by the new backup (timestamp in the file name is NOT considered to determine whether or not a previous backup exists).
Restore Database #
Use this procedure to restore a backup of the instrument local database.
To restore, follow these steps:
1. Access restore procedure:
- from Overcharts main window > Instruments menu > Restore Database
- or to restore the database of a specific instrument:
1. From Overcharts main window > Instruments Tab, select the instrument to restore
2. Right click > Restore Database
2. Select the backup file (.bak)
3. Select the instrument where to restore the database. Be very careful to select the correct instrument! Restore procedure checks the compatibility between the backup file and selected instrument and highlights (in red) any important differences found:
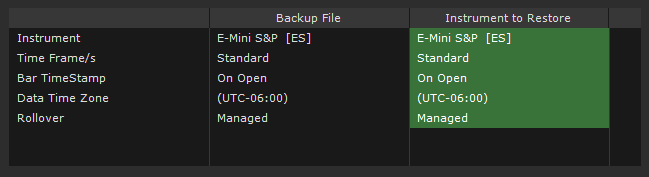
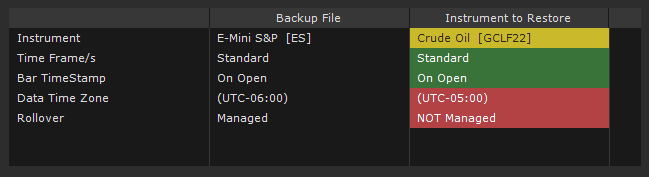
Compared properties:
- Instrument: instrument name / symbol.
- Time Frame/s: time frames present (standard / customized).
- Bar TimeStamp: specifies whether bar timestamp is the opening or closing time.
- Data Time Zone: specifies data time zone.
- Rollover: (futures only) specifies whether rollover is managed or not.
In order to run the restore, ALL properties must be compatible (green background)! If even just one property is not compatible (with exception of instrument name/symbol) you will not be able to proceed with the restore.
Double check you have selected the correct instrument! Even if properties are all compatible, it does NOT mean that selected instrument is the correct one. Restore will overwrite local database with backup database. The operation is irreversible!
4. Press Restore button to start the procedure.
F.A.Q. #
How do I transfer the database to my new PC? #
When you change PC or create a new workstation you DO NOT have to worry about copying Overcharts settings from one PC to another. All configurations, charts or other (except historical data series), are automatically synchronized in each of your workstations. In other words, by accessing Overcharts from the new PC, all configurations will be synchronized automatically.
What is NOT synchronized are the instrument HISTORICAL DATA SERIES. This is because historical data is NOT saved on our servers. Data is re-downloaded from your data-feed on first connection.
As you well know, data-feeds often DO NOT provide the historical series of expired futures contracts, or in any case have limitations in the number of days/months available. For this reason, in your new PC you may not find all the data that was present in the old PC.
In addition to this, re-downloading all instrument historical data on a new PC could require a lot of time or Internet traffic (some data-feeds have limitations in the number of Giga-Bytes that can be downloaded weekly).
For these reasons, you may be interested in MANUALLY copying local database from old PC to new PC. In that case, follow these steps:
- Access the Local Database Settings window > Path Tab
- Path field shows full path of folder containing all historical data of instruments.
- Open Windows File Explorer and copy the entire folder to new PC, RESPECTING the exact path. IT IS FUNDAMENTAL TO RESPECT THE EXACT PATH IN THE NEW PC!


