

DOM (Depth Of Market) shows all limit orders placed but not yet executed for an instrument. The greater the number of orders in a certain price level, the greater the interest in that level.
Using the DOM you can trade and then:
- Place or cancel an order with just one click
- modify the order price with Drag & Drop
- modify the order size
- display all orders you have placed for an instrument/account
- place complex strategies such as Bracket orders, OCO (One Cancels Other) and OSO (Order Sends Order)
- close or reverse an open position
Create a new window #
You can create a new DOM (Depth of Market) window in one of the following ways:
- from Workspace window > New menu > DOM (Depth of Market)
- or by pressing the appropriate button in the Tool-Windows toolbar of Workspace window
Main Columns: Price, Bid, Ask #
DOM main columns are:
PRICE: represents the instrument price scale. Usually price increment between one level and another is the Tick-Size. Tick-size is the minimum price movement defined in the instrument configuration (Overcharts main window > Instruments Tab).
However, for some instruments such as US-stocks, forex or others where the tick-size can be very small compared to the instrument current price, it is useful to set a price increment higher than the tick-size (x times the tick-size), in order to group x levels into one and avoid a too frenetic DOM.
You can change the price increment, in one of the following ways:
- Press gear button on Price column header > Define the price increment as x times the instrument tick-size
- or use mouse wheel + CTRL on Price column
- or press gear button at the top right of DOM window > General Properties > Price Increment
NEVER change the tick-size in the instrument configuration! ALWAYS and ONLY modify the price increment as described above.
You can center price scale in 2 ways:
Semi-Static: (RECOMMENDED) price scale is automatically centered only if best Bid/Ask hits current-price-scale top/bottom.
Dynamic: price scale is always automatically centered. In other words, best Bid and Ask are always kept in the middle of scale. Avoid using this mode when trading from DOM.
To center price scale at any time, press Center Price Scale button at the top left next to BID column header.
You can pause automatic centering for 60 seconds by pressing Pause button at the bottom right next to ASK column.
Use mouse wheel on Price column to scroll the DOM
BID: Shows all buy orders placed but not yet executed for the instrument. In other words, quantity in each price level represents the sum of all ‘placed but not yet executed’ orders in that price level.
ASK: Shows all sell orders placed but not yet executed for the instrument. In other words, quantity in each price level represents the sum of all ‘placed but not yet executed’ orders in that price level.
If price increment is greater than instrument tick-size (multiple price levels are grouped into a single level), quantities displayed in Bid/Ask columns will also be grouped.
Additional Columns #
In addition to the classic Price/Bid/Ask columns, other columns are available:
Volume Profile: Represents instrument volume profile built on current session. You can define the session in the column configuration. This column needs 1-tick resolution data to be calculated. For this reason loading/calculation may take a while.
Profit/Loss (PnL): Highlights current-open-position profit/loss. If there are no open positions for the instrument, column will be empty.
Notes: Useful column for annotations or to tag price levels by inserting any type of text.
You can add the same column multiple times by configuring it differently. For example, you can add 2 or more Volume Profile columns by configuring a different session on each of them.
Add a Column #
To add one or more Columns, follow these steps:
- Access Additional Columns configuration window in one of the following ways:
- press gear button at the top right of DOM window > Additional Columns
- or press “+” button (Add/Edit Columns) at the top right next to ASK column header
- Select the column to add from Available columns list
- Press Add button at the bottom left (below configured columns list). Column will be added to the Configured columns list
- (optional) Select the column in the Configured columns list and modify calculation/style properties according to your needs
- (optional) Repeat steps 2, 3, 4 to add more columns
- Press OK or Apply to confirm
Remove a Column #
To remove one or more Columns, follow these steps:
- Access Additional Columns configuration window in one of the following ways:
- press gear button at the top right of DOM window > Additional Columns
- or press “+” button (Add/Edit Columns) at the top right next to ASK column header
- Select the column to remove from Configured columns list
- Press Remove button at the bottom left (below configured columns list)
- (optional) Repeat steps 2, 3 to remove more columns
- Press OK or Apply to confirm
Relocate a Column #
To relocate a Column, follow these steps:
- Access Additional Columns configuration window in one of the following ways:
- press gear button at the top right of DOM window > Additional Columns
- or press “+” button (Add/Edit Columns) at the top right next to ASK column header
- Select the column to move from Configured columns list
- Press Up/Down buttons at the bottom left (below configured columns list) to move column in the list
- (optional) Repeat steps 2, 3 to relocate more columns
- Press OK or Apply to confirm
You can also relocate an additional column using Drag & Drop (by selecting the column and dragging it to the right or left while holding down left mouse button and releasing it once the desired location is reached).
General Properties #
To access general properties window:
- press gear button at the top right of DOM window > General Properties
Available properties:
Bid/Ask Total Size: Defines maximum number of bid/ask levels used to calculate the two respective total quantities (displayed on DOM grid footer). Useful when your data-feed provides high market depth (many bid/ask levels), but you want to total the bid/ask quantities using only the best x levels (i.e. bid/ask levels closest to current price), filtering the background noise caused by levels very far from current price.
Price Increment (in ticks): Defines price increment (in ticks) between one DOM level and another (usually the Tick-Size). Tick-size is the minimum price movement defined in the instrument configuration (Overcharts main window > Instruments Tab).
However, for some instruments such as US-stocks, forex or others where the tick-size can be very small compared to the instrument current price, it is useful to set a price increment higher than the tick-size (x times the tick-size), in order to group x levels into one and avoid a too frenetic DOM.
View Properties #
You can customize DOM using view/style properties available in Settings menu (gear button at the top right of DOM window).
Daily Values: (session) choose whether or not to display values such as Open, High, Low, Previous Close, Total Volume, Time and last price/quantity traded, difference with the previous close:
- None: Hides all values
- All: Shows all available values
- Time/Last/%/Size/Volume: Only shows information about last trade, difference in % with the previous close, and session total volume.
Bars on Bid/Ask: Choose whether or not to display volume bars on bid/ask columns.
Text Size: Define font size to use on DOM grid.
Theme: Choose whether to display DOM grid in standard or zebra mode. If zebra, two shades of color are used for price levels background resulting in a zebra effect on the grid.
Always On Top: If checked, DOM window is always kept on top of belonging Workspace. Property has no effect if DOM window is docked to Workspace window.
Save Settings as Default: Saves DOM current settings as default. DOM windows opened after saving will all have the new defaults.
Reset Defaults to Factory Values: Resets default settings to factory values. Reset only affects windows opened after the reset.
Reset DOM Column Settings: Resets settings (width) of main DOM columns only: Price, Bid and Ask.
Link DOM to a Chart / T&S / Watchlist / DOM #
Using instrument-Link you can link a DOM window to one or more Chart, Watchlist, Time & Sales, Order-Entry, other DOM etc. windows. Instrument-Link allows you to automatically change the instrument on linked Charts, DOMs, T&Ss.
To link DOM to a chart, please follow these steps:
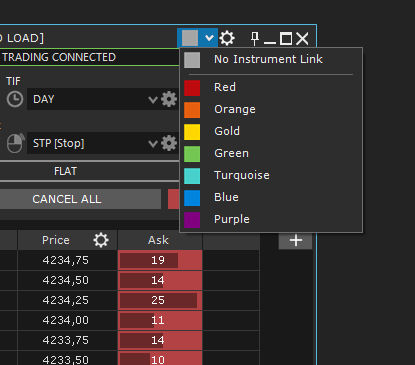
1. Select a color from instrument-link available color list at the top right of DOM window:
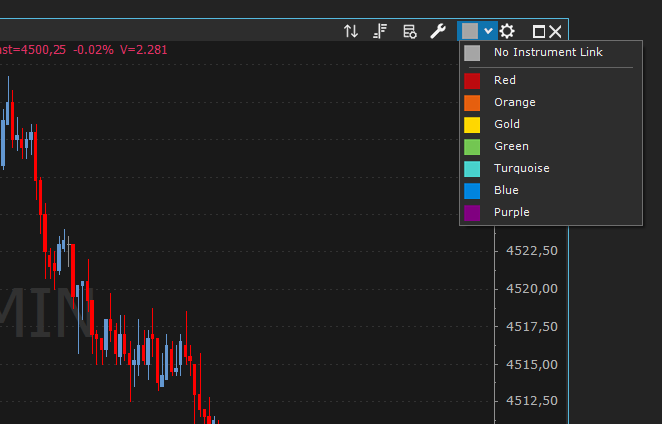
2. Select the same color chosen for DOM, on instrument-link at the top right of chart window:
3. That’s all! Now the two windows are linked to each other.
4. To link other windows, set the same color chosen in the DOM also in the other windows, exactly as you did with chart.
Trading #
DOM main feature is Trading. DOM can be considered, together with Chart Trading, the main trading method on Overcharts.
Place an Order #
DOM uses Trading-Panel to place an order. Trading-Panel contains all order information: Type, Quantity, TIF etc. Trading-Panel also displays information on account/instrument current position and allows to close or reverse the position, cancel all orders of a specific instrument, and many other functions. For more info on Trading-Panel, see the page: Trading Panel
To place an order, please follow these steps:
1. Set order type corresponding to the mouse left and/or right click according to the order to be placed. In Overcharts there are 2 macro categories of orders: LIMIT ORDERS (which include limit, iceberg, market if touched etc. orders) and STOP ORDERS (which include stop, stop limit, trailing stop, trailing stop limit etc. orders).
Available order types may change depending on data feed
To place a LIMIT order, select “LMT [Limit]” order type in the combo-box associated with mouse left click.
To place a STOP order, select “STP [Stop]” order type in the combo-box associated with mouse right click.
Then define whether it is a Single, OCO, OSO or Bracket order (for more information see Trading-Panel page).
2. Set order quantity, and TIF (Time in force)
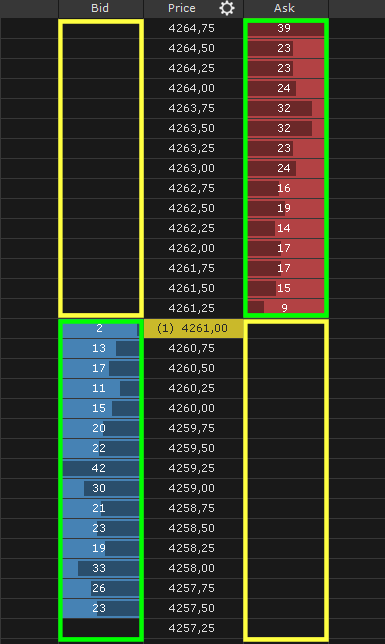
3. If the order is a buy order go over BID column, then:
- If the order is a LIMIT order, click with left mouse button on a price level lower than or equal to Best Bid (see in the image below the green area highlighted on BID column)
- If the order is a STOP order, click with right mouse button on a price level greater than Best Bid (see in the image below the yellow area highlighted on BID column)
If the order is a sell order go over ASK column, then:
- If the order is a LIMIT order, click with left mouse button on a price level greater than or equal to Best Ask (see in the image below the green area highlighted on ASK column)
- If the order is a STOP order, click with right mouse button on a price level lower than Best Ask (see in the image below the yellow area highlighted on ASK column)
If with left mouse button (limit order) you click on DOM areas highlighted in yellow, the limit order will most likely be executed immediately. For some traders this could be an inconvenience. To prevent placing limit orders by clicking on DOM areas highlighted in yellow, deselect ‘Allow Left Click Above/Below market‘ property in Trading-Settings window (see below for a detailed description).
Modify Order Price #
You can change a working order price, in one of the following ways:
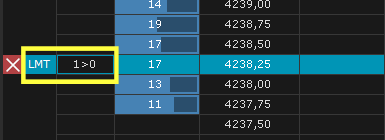
- Left click on yellow area highlighted in the image below, then drag the order over new price level by holding down the left mouse button. Finally release the left mouse button.
- or right click on yellow area highlighted in the image below > Modify Price > Select the order to modify or Modify All if there are more orders in the same level.
Modify Order Quantity #
You can change (if allowed) a working order quantity, in one of the following ways:
Left Click on yellow area highlighted in the image below, then select new quantity:
or Right Click on yellow area highlighted in the image below > Modify Quantity > Select the order to modify > Select new quantity
Cancel an Order #
You can cancel an order, in one of the following ways:
- Left Click on red X button of the order
- or right click on red X button of the order > Select the order to cancel or Cancel All to cancel all orders in the price level
To cancel all orders in the DOM or just buy/sell orders, press corresponding buttons on Trading-Panel. For more information see Trading-Panel page.
Place a MARKET Order #
Even if DOM is not designed for placing market orders, it is nevertheless possible and useful in certain cases to be able to place a market order, i.e. an order to be executed immediately at the current Bid or Ask price depending on whether it is respectively a sell or buy order.
You can place a MARKET order in one of the following ways:
- Press Buy MKT or Sell MKT button respectively if you want to place a buy or sell market order
- or, if allowed by data-feed and by selected order type, left click on levels above Best BID to buy ‘at market‘, or left click on levels below Best ASK to sell ‘at market‘. To place a market order in this way, ‘Allow Left Click: Above/Below market‘ property must be checked in Trading-Settings window
Close or Reverse the Position #
You can close or reverse current position from Trading-Panel by pressing CLOSE or REV button respectively. Both functions also cancel ALL working orders of instrument/account. For more information, see Trading-Panel page.
Trading Settings #
You can customize DOM Trading using properties available in Settings menu (gear button at the top right of DOM window) > Trading Settings.
Trading Panel
- Position: Specifies Trading-Panel position within DOM window (top, bottom, right, or left)
- Position Label Format: Specifies what information to display about current position (quantity, price, Profit/Loss)
DOM Grid
- Show ‘placeable-order-types’ Tooltip: Specifies whether or not to display the tooltip indicating which order types you can place in a given price level
- Allow Left Click: Above/Below market: If checked, it allows to place limit orders by left clicking on price levels above Best BID (BID column) and on price levels below Best ASK (ASK column). Orders placed in these areas will most likely be executed immediately
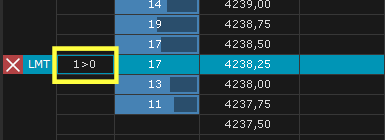
- Order-Qty Column format: Defines the format of DOM column containing the quantity of your working orders. You can choose whether or not to display total, filled and working quantity.
- Order Highlighter: Specifies the style to use for displaying orders on DOM
- Order Link Line: Specifies the style to be used to display connecting lines of OCO, OSO, or Bracket orders
- You can also define the color to use to display orders (based on order type) and the color to use to display the position (based on position side: Long/Short).
Buttons
- Buy ASK / Sell BID: If checked, Buy ASK and Sell BID buttons are shown on DOM
- Buy BID / Sell ASK: If checked, Buy BID and Sell ASK buttons are shown on DOM


