Hot-Keys are key combinations you can configure according to your preferences to quickly execute commands via keyboard.
Assign a Hotkey to an action #
There are many commands available to which you can assign a Hotkey. Some have already assigned a default Hotkey that you can change at any time according to your needs.
To assign a Hotkey to an action, follow these steps:
1. Access Hot-Keys configuration window from Overcharts main window > Tools menu > Hot Keys
2. Select the action you want to assign (or modify) the Hotkey
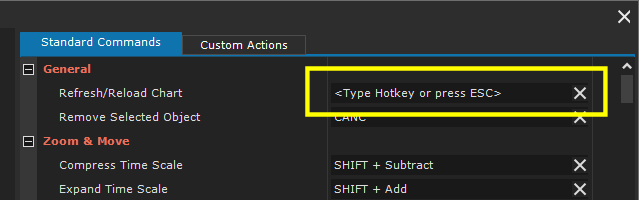
3. Click on Hotkey cell. The following sentence is shown inside the cell: Type hotkey or press ESC
4. Press the key combination you want to assign the action to.
A Hotkey consists of a combination of CTRL, ALT, SHIFT and any other key (letter, number, symbol, etc.). Keys must be pressed in sequence. For example, if you want to assign CTRL+A to an action you will have to press CTRL key, then holding down CTRL you will have to press A. if you want to assign CTRL+ALT+A you will have to press CTRL key, then holding down CTRL you will have to press ALT and then A.
Some key combinations are NOT valid as Hot-Keys. Others, while valid, will not work because they are reserved combinations of the Windows operating system.
Some keys can also be used individually (without CTRL, ALT, SHIFT):
- F1 … F12, Page Up, Page Down, Delete, Home, End, Up Arrow, Down Arrow, Right Arrow, Left Arrow.
5. Press OK or APPLY in the Hot-Keys configuration window to save the changes.
If an action does NOT have a hotkey assigned, the message <none> is shown in the hotkey cell.
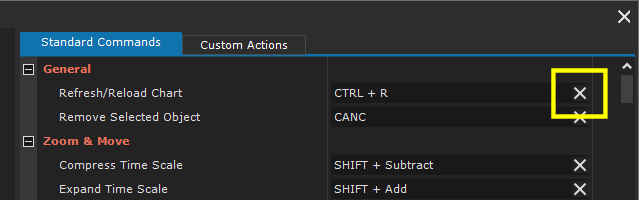
To unassign the hotkey from a command press X button in the hotkey cell:
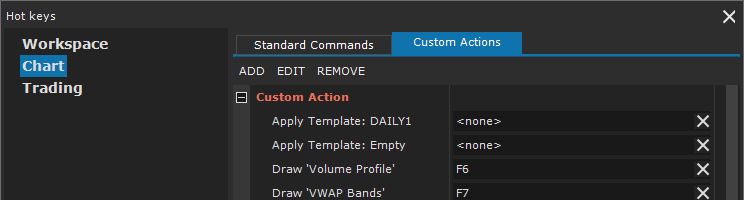
Custom Actions #
Additional custom actions can be added to the existing preconfigured actions.
Add a Custom Action #
To add a Custom Action, follow these steps:
1. Access Hot-Keys configuration window from Overcharts main window > Tools menu > Hot Keys
2. Select the Custom Action reference section on the left tree-view.
Custom Actions are ONLY available for some sections (not all sections).
If Custom Actions are available for a section, you will find the Custom Actions Tab in the right properties-panel:
3. Select (if available) Custom Actions Tab
4. Press ADD button
5. Select Custom Action type from the list of available types
6. Set Custom Action properties and press OK
7. Assign a hotkey to the Custom Action as described here
8. Press OK or APPLY button in the Hot-Keys configuration window to save all changes.
Edit a Custom Action #
To edit a Custom Action, follow these steps:
1. Access Hot-Keys configuration window from Overcharts main window > Tools menu > Hot Keys
2. Select the Custom Action reference section on the left tree-view.
3. Select Custom Actions Tab
4. Select, on the grid, the Custom Action to edit and press EDIT button
5. Set Custom Action properties and press OK
6. Press OK or APPLY button in the Hot-Keys configuration window to save all changes.
Remove/Delete a Custom Action #
To remove/delete a Custom Action, follow these steps:
1. Access Hot-Keys configuration window from Overcharts main window > Tools menu > Hot Keys
2. Select the Custom Action reference section on the left tree-view.
3. Select Custom Actions Tab
4. Select, on the grid, the Custom Action to remove and press REMOVE button
5. Press OK or APPLY button in the Hot-Keys configuration window to save all changes.
An important example is the Custom Action called Draw Drawing Tool. This Custom Action allows you to start (by pressing the assigned hotkey) the drawing of a Trendline, Horizontal Line, or any other drawing tool. But the most important feature of this Custom Action is the ability to set a template to use when creating the object. In other words, by adding for example 2 ‘Draw Drawing Tool’ Custom Actions to draw a trendline and setting a different Template for each one in the Custom-Action configuration, you can draw (by pressing the assigned hotkey) the right trendline without having to set style properties every time.
Other Custom Actions allow you to insert Indicators, Charts, Advanced Columns, Trading System etc. setting a template, making adding the object to the chart very fast.
Hot-Keys Usage #
Use Hot-Keys you have configured to execute commands within the Workspace.
Each Hot-Key works ONLY IF:
- pressed in the right context (Workspace, Chart, DOM etc.) where the action to be performed is available. In other words, if for example a hotkey that starts the drawing of a trendline is pressed on DOM window, the assigned action will NOT be performed.
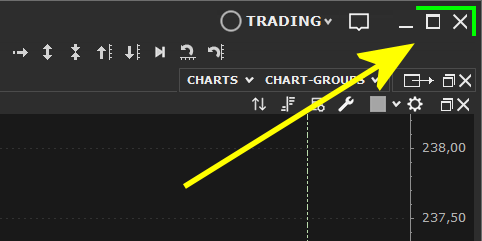
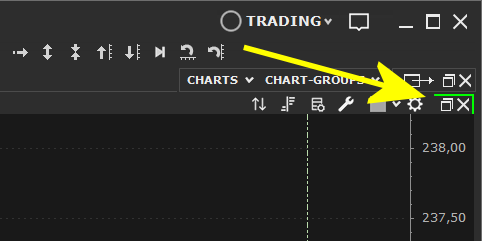
- when the hotkey is pressed, the window is focused. The focused window is the window with the upper right corner marked.
Example of Workspace window focused:
Example of Chart window focused:
Example of DOM window focused:
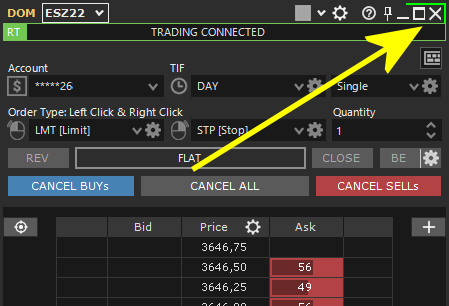
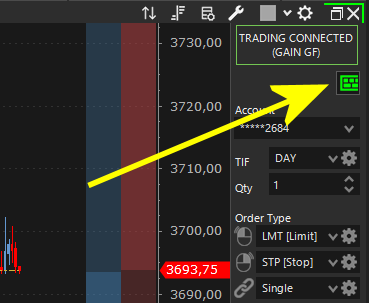
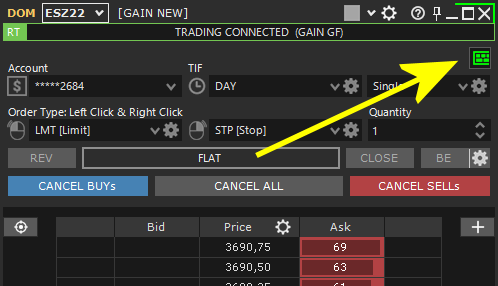
For Hot-Keys assigned to Trading commands, you need to enable Hot-Keys also in the Trading Panel by pressing ‘keyboard’ button: