

An Alert is a warning notified to the user on-screen (through a special window) or via sound, when specific conditions occur. The simplest (but also the most used) alert is the price level alert. When a specific price level is reached / broken, the user is notified.
Add an Alert #
Alerts are always based on Charts, Indicators and Drawing Tools. In other words, an Alert can ONLY be created / attached to a Chart, an Indicator or a Drawing Tool.
To add an Alert, follow these steps:
- Right-click on chart, indicator or drawing tool to which you want to attach the Alert > Alerts > Insert New
- The window containing all new Alert settings will open.
- Complete any settings / conditions that were not automatically filled in or change them to your needs.
- Press OK to create the Alert.
The most common alert is the price level alert. When a specific price level is reached / broken, the user is notified via screen or sound.
To add a price level Alert, follow these steps:
- Draw a horizontal line on chart exactly on the Alert price level.
- Right-click on the horizontal line > Alerts > Insert New
- The window containing all new Alert settings will open. Settings are all filled in automatically but you can change them according to your needs.
- Press OK to create the Alert.
Properties #
General #
- Enabled: If checked, it enables the Alert.
- Name: Name identifying the alert in the on-screen message and in the Alerts-Log window.
- Reset: Determine if and when to reset / rearm the Alert to make it enabled again once triggered:
- Never: The Alert is never re-enabled once triggered.
- On new bar: The Alert is rearmed starting from the bar following last trigger.
- On new session: The Alert is rearmed starting from the session following last trigger.
- On condition reversed (the condition is no longer true): The Alert is rearmed if the condition that triggered it is no longer true (e.g. if the alert was triggered when a price level was broken up and the price subsequently falls back below that level, the Alert is rearmed).
- Remove Alert: The Alert is removed after being triggered.
- Message: Message to be displayed on screen and in the Alerts-Log window.
- Priority: This is the priority with which the alert is checked and displayed (when triggered).
Conditions #
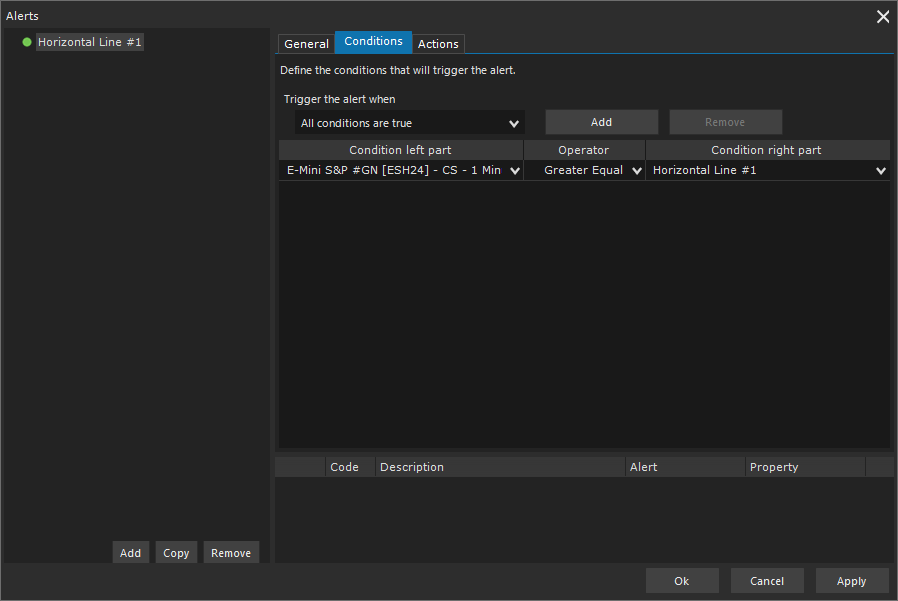
Conditions Tab contains all the alert conditions. You can combine multiple conditions together so that the Alert is triggered when just one of the specified conditions is true or only when all defined conditions are true.
By selecting Trigger the alert when:
- All conditions are true: the Alert will be triggered ONLY when all the defined conditions are true
- One or more conditions are true: the Alert will be triggered if at least one of the defined conditions is true
To add a condition press Add button, to remove it, select the condition on grid and press Remove button.
A condition consists of 3 parts: <left part> <operator> <right part>
Example:
In the Close > 100 condition, Close is the left part of the condition, the “>” sign is the operator, 100 is the right part of the condition.
Each individual condition corresponds to a row in the grid. The grid consists of 3 columns:
- Condition left part: defines the object / value that represents the left side of the condition.
- Operator: It is the comparison operator between the left and right parts of the condition.
- Condition right part: defines the object/value that represents the right side of the condition.
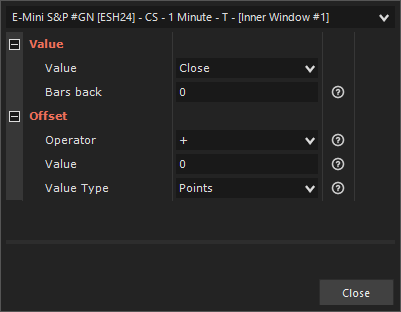
To define the right (or left) part of the condition:
- Click on the respective grid combo-box.
- Select the object from those available.
- Set the Value to use:
Value: Select the value from those available (e.g. for charts you can choose between Open, High, Low, Close, Volume etc.)
Bars back: 0 = current bar; different from zero = number of bars preceding current one where Value is to be taken (e.g. if Bars back is 1, the object Value corresponding to the previous bar will be taken). - Set the Offset (generally NOT used): If defined, Value will be modified based on the defined offset (E.g. to add 10 points to Value, define the Offset like this: Operator: +, Value: 10, Value Type: Points).
Actions #
When an Alert is triggered, you can perform one or more actions at the same time:
- Play a sound: You can select the sound to play from those available. You can also test the sound by pressing Test Sound button.
- Display a pop-up window: A message will be displayed on-screen. The window will take on a different color depending on Alert priority and if appropriately set, it will be closed automatically after x seconds.
Manage #
To access the alert management window to modify the alert properties, or copy / remove the alert:
- Right-click on chart window > Alerts
- or Right-click on a Chart, Indicator or Drawing Tool > Alerts > Manage
Then select the Alert in the list on the left and press Copy button (to copy the Alert), Remove (to remove the Alert), or modify the properties according to your needs.
Alerts-Log window #
The list of Alerts triggered is available in the Alerts-Log window, which you can access in one of the following ways:
- Workspace window > New menu > Alerts Log
- or Workspace window > Tool Windows toolbar > Alerts-Log button
Available Columns #

- Instrument name: instrument name where the Alert was triggered.
- Symbol: instrument symbol where the Alert was triggered.
- Instrument type: instrument type (Futures, Stock etc.).
- Resolution: chart resolution where the Alert was triggered.
- Workspace: workspace where the Alert was triggered.
- Source: Chart or Script. If Chart, the Alert was triggered by a Chart. If Script, the Alert was triggered by an Overbasic script.
- Source description: description of the chart / script that triggered the Alert.
- Alert: Alert name.
- Priority: priority (High, Medium, Low).
- Locale date/time: Date/Time in which the Alert was triggered (expressed in PC time zone).
- Triggered value: Value that triggered the Alert.
- Message: Alert message.
Settings #
You can customize the window using view/style properties available in Settings menu (gear button at the top right of the window).
Below are the available settings / commands:
Clear all: cleans the log.
Export: exports the grid to a text file (.csv or .txt).
Instrument type: filters grid data according to the selected criteria.
Priority: filters grid data according to the selected criteria.
Source type: filters grid data according to the selected criteria.
Workspace: filters grid data according to the selected criteria.
Edit Columns: Define the columns to show in the grid.
Text Size: Define font size to use on grid.
Theme: Choose whether to display the grid in standard or zebra mode. If zebra, two shades of color are used for price levels background resulting in a zebra effect on the grid.
Always On Top: If checked, the window is always kept on top of the Workspace it belongs to. The property has no effect if the window is contained within the Workspace window.
Save Settings as Default: Saves window current settings as default. Alerts-log windows opened after saving will all have the new defaults.
Reset Defaults to Factory Values: Resets default settings to factory values. Reset only affects windows opened after the reset.


