

Trading Panel is a fundamental component for placing orders in Overcharts. Using Trading Panel you can set all parameters of the order being placed, Close or Reverse the open position, cancel working orders, place Market orders etc.
Trading Panel can be horizontal or vertical depending on the window in which it is contained.
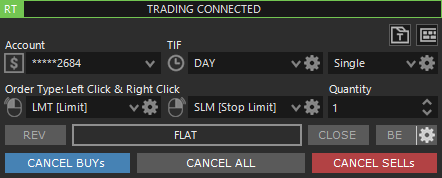
Trading Panel on DOM:
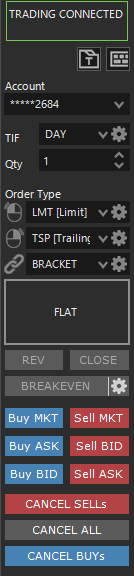
Trading Panel on Chart:
Activate Trading in the Workspace #
Trading Panel is enabled ONLY if trading is activated in the Workspace (and chart in case of chart trading)
To place orders you need to activate trading in the Workspace where DOM or Chart is contained.
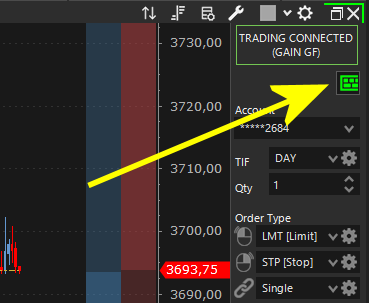
To activate trading, press TRADING button at the top right of Workspace window:
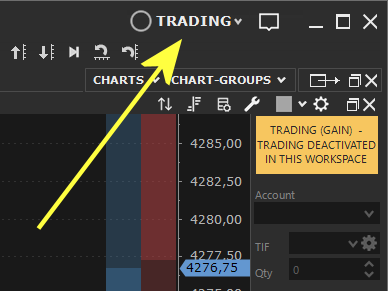
In Overcharts, each Workspace is an independent environment. If you wish, you can activate trading only on certain Workspaces, thus distinguishing trading workspaces from view-only ones.
For chart trading, trading must also be enabled in chart window (as well as in the Workspace where the chart is contained).
To enable trading in a chart window:
- Right click on chart window > Enable Chart Trading
- or from Chart Trading menu at the top right of chart window > Enable Chart Trading
Trading Panel shows trading status in the Chart, DOM or Order-Entry where the panel is contained. Status is highlighted in:
- GREEN when trading is enabled
- YELLOW when trading is disabled
Order Parameters #
To set order parameters you MUST activate Trading in the Workspace (and chart in case of chart trading)
Order main parameters are: Account, TIF, Quantity and Order Type.
Account: Defines on which account to place the order (to be used when you can access several accounts from the same connection). Account list is only available when you are connected to the broker.
TIF (Time In Force): Defines how long a working order will remain active waiting to be executed.
There are different types of TIFs. Below is the list of the most common:
- DAY: order valid for the day/session only
- GTD (Good Till Date): order valid up to a specific date (to be defined in the additional TIF settings)
- GTC (Good Till Cancelled): order valid until cancelled
- FOK (Fill Or Kill): order must be immediately and completely filled or canceled
- IOC (Immediate Or Cancel): order must be executed immediately, and any portion of the order that cannot be immediately filled is cancelled
- AON (All Or None): order is completely filled or cancelled, never partially filled.
There are other less important TIFs, or available depending on broker/data feed.
NOT all TIFs are available on all brokers/data-feeds. Often rules by which the various TIFs can be used also change. Ask your broker/data-feed if you have any doubts about the available TIFs, their use and what instruments or order-types they can be used with.
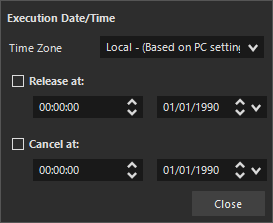
If ‘TIF + Order Type‘ combination allows it, you can also define the order release and/or cancellation date/time.
To set a release and/or cancellation date/time:
- Select the TIF
- Press gear button to the right of TIF > Set the release and/or cancellation date/time
Qty: Defines order quantity. It is usually represented by an integer. For some instruments (CFDs or Crypto Currencies) it can also be decimal.
Order Type: In Overcharts there are 2 macro categories of orders: LIMIT ORDERS (which include limit, iceberg, market if touched etc. orders) and STOP ORDERS (which include stop, stop limit, trailing stop, trailing stop limit etc. orders).
LIMIT orders are ALWAYS associated with mouse LEFT click, while STOP orders are ALWAYS associated with mouse RIGHT click.
Set order type corresponding to the mouse left and/or right click according to the order to be placed. For example, to place a LIMIT order, select ‘LMT [Limit]’ order type in the combo-box associated with mouse left click. To place a STOP order, select ‘STP [Stop]’ order type in the combo-box associated with mouse right click.
Available order types may change depending on data-feed
Main Order Types and their Additional Parameters #
Available order types and their additional configuration properties may change depending on data-feed
Some order types have additional properties. To set these properties:
- Select the order type in the combo-box
- Press gear button to the right of Order-Type > Set the parameters
Order types that can be associated with mouse LEFT click:
- MKT – Market: ‘at market’ order. The order is executed immediately at current Bid price (sell order) or at current Ask price (buy order). Execution price can even be worse than the best Bid/Ask price! In a market order, execution price is never predefined, but always depends on quantity available on book.
- LMT – Limit: order is executed when set price level is reached.
- ICE – Iceberg: special limit order where total order quantity is exposed in small tranches on the market. Tranche size is defined in the additional properties > gear button to the right of order-type.
- MIT – Market If Touched: order remains on stand-by until the defined price level (trigger) is reached, then placed as a Market order.
- LIT – Limit If Touched: order remains on stand-by until the defined price level (trigger) is reached, then placed as a Limit order. Limit price is obtained by adding to the ‘trigger’ price an offset defined in the additional properties > gear button to the right of order-type.
Order types that can be associated with mouse RIGHT click:
- STP – Stop: order remains on stand-by until the defined price level (trigger) is reached, then placed as a Market order.
- SLM – Stop Limit: order remains on stand-by until the defined price level (trigger) is reached, then placed as a Limit order. Limit price is obtained by adding / subtracting to the ‘trigger’ price an offset defined in the additional properties > gear button to the right of order-type.
Limit Price is then calculated as follows:
> Buy Order: Limit Price = Trigger Price + Offset
> Sell Order: Limit Price = Trigger Price – Offset
Some data feeds (e.g., CQG, Interactive Brokers) allow use of a negative offset in Limit Price calculation. According to the formulas above, a negative offset leads to:
> For a buy order, Limit Price is lower than Trigger Price.
> For a sell order, Limit Price is higher than Trigger Price.
As a result, once Trigger Price is reached, the order becomes a limit order that is not executed immediately, but placed in the book at the specified Limit Price. This setup allows stop orders to act as conditional orders: when the trigger condition is met, a limit order is submitted at the desired price. - TSP – Trailing Stop: order remains on stand-by until the defined price level (trigger) is reached, then placed as a Market order. The peculiarity of this order type is to maintain a constant distance from current prices (order ‘trigger’ price is changed automatically) in case the market moves ‘in favor’.
- TSL – Trailing Stop Limit: order remains on stand-by until the defined price level (trigger) is reached, then placed as a Limit order. The peculiarity of this order type is to maintain a constant distance from current prices (order ‘trigger’ price is changed automatically) in case the market moves ‘in favor’. Current price to ‘follow’ is defined in the additional properties. Limit price is obtained by adding / subtracting to the ‘trigger’ price an offset defined in the additional properties > gear button to the right of order-type.
Limit Price is then calculated as follows:
> Buy Order: Limit Price = Trigger Price + Offset
> Sell Order: Limit Price = Trigger Price – Offset
Some data feeds (e.g., CQG, Interactive Brokers) allow use of a negative offset in Limit Price calculation. According to the formulas above, a negative offset leads to:
> For a buy order, Limit Price is lower than Trigger Price.
> For a sell order, Limit Price is higher than Trigger Price.
As a result, once Trigger Price is reached, the order becomes a limit order that is not executed immediately, but placed in the book at the specified Limit Price. This setup allows stop orders to act as conditional orders: when the trigger condition is met, a limit order is submitted at the desired price.
If you are not very experienced, we recommend you do some research on the Internet to learn more about order types. This is general information and is available everywhere
Single Order or Complex Strategy #
Define, using appropriate combo-box, if the order being placed is a Single, OCO, OSO or BRACKET order.
Single: order being placed is a single order corresponding to the selected order type.
OCO (One Cancels Other): is a complex strategy which consists of placing two distinct but linked orders. When one is filled, the other is automatically cancelled.
OSO (Order Sends Order): is a complex strategy which consists in placing two distinct orders linked together in a Master/Slave way:
- first order placed is the main order
- Main order is immediately placed on market (unless special conditions defined in the TIF)
- Secondary order is NOT placed on market, but held in stand-by by broker/data-feed.
- ONLY after the execution of main order, secondary is placed on market.
BRACKET: is a complex strategy which consists of placing one or more Profit-Target and/or Stop-Loss orders simultaneously with the main order:
- For each bracket you can insert up to a maximum of 3 Profit-Targets and 3 Stop-Losses. However, maximum number depends on data-feed used. Some data feeds (e.g., CQG), while natively supporting only a single Target/Stop-Loss level, still allow multi-level management. To enable the placement of multiple Target/Stop-Loss levels, multiple Bracket orders are sent, each with a single Target and Stop-Loss level.
- Profit-Target and Stop-Loss orders are kept in stand-by by broker/data-feed and placed ONLY after the execution of main order.
NOTE:
If main order of a Bracket is a Stop-Limit (SLM) or Trailing-Stop-Limit (TSL):
- If offset used to calculate Limit Price is positive, Trigger Price will be used as reference for placing Stop-Loss and Profit-Target.
- If offset is negative, Limit Price will be used as reference for placing Stop-Loss and Profit-Target.
Position #
In the Trading Panel there is a section containing information on current position of instrument/account, and in particular:
- if position is FLAT (closed)
- if open and LONG >> border of section containing position information is colored with the color (defined in trading settings) that identifies a LONG position
- if open and SHORT >> border of section containing position information is colored with the color (defined in trading settings) that identifies a SHORT position
When the position is open, information on Quantity, Average Price and Profit/Loss is also shown. You can choose which information to show by setting Position Label Format property in the relevant trading configuration of DOM, Chart Trading and Order-Entry.
Furthermore, background of rectangle containing position information turns Green or Red depending on current Profit/Loss:
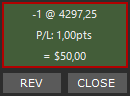
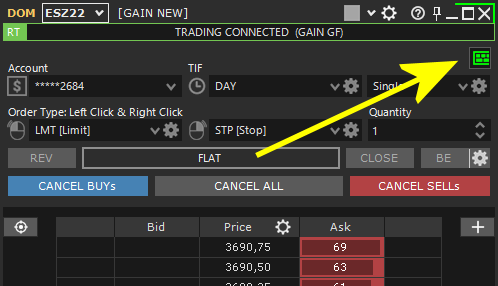
You can close or reverse current position by pressing CLOSE or REV button respectively. Both functions FIRST perform the cancellation of ALL placed orders of the instrument+account. The Market order that closes or reverses the position is placed only when ALL orders have been cancelled. In other words, all orders need to be cancelled before closing the position. This is due to various reasons including to avoid the lack of margin required for placing the Market close/reverse order.
Breakeven Button #
Breakeven button allows you to quickly place/modify a Breakeven order, that is a STOP-MARKET order with trigger price equal to the average price of current OPEN Position +/- an Offset in Ticks, Points or Currency.
In other words, the breakeven is used to close a position avoiding losses in the event that, after having been virtually profitable, the market changes direction.
Breakeven button is enabled and visible only if trading is enabled in the workspace/chart, the position is open and your data-feed allows it
How to use it:
1. Open a position (LONG or SHORT) on the instrument
2. Click on gear icon on the right of the breakeven button and set the offset that the breakeven must have with respect to the posizione average price
3. If position is LONG, wait for current prices to go beyond the threshold defined for breakeven order (position-average-price plus offset), then press Breakeven button to place a new STOP-MARKET sell order with quantity equal to the position quantity. If there are already one or more STOP-MARKET sell orders, and total sum of their quantities is equal to the position quantity, breakeven button will move existing orders to the breakeven price, otherwise an error message will be displayed.
If position is SHORT, wait for current prices to fall below the threshold defined for breakeven order (position-average-price minus offset), then press Breakeven button to place a new STOP-MARKET buy order with quantity equal to the position quantity. If there are already one or more STOP-MARKET buy orders, and total sum of their quantities is equal to the position quantity, breakeven button will move existing orders to the breakeven price, otherwise an error message will be displayed.
ONLY orders actually placed in the market and awaiting execution contribute to the quantity counting to determine whether to place a new breakeven order or modify the existing STOP-MARKET orders.
We recommend you understand very well how breakeven works by using a demo account to avoid unexpected new orders or changes.
Quick buttons for order entry #
To place Market orders you can also use BUY-MKT or SELL-MKT buttons.
To place Limit orders directly on best Bid or Ask prices you can use BUY-ASK, SELL-BID, BUY-BID, SELL-ASK buttons.
Order Cancellation #
To cancel ALL orders for a specific instrument/account or only BUY or SELL orders you can use CANCEL ALL, CANCEL BUYs and CANCEL SELLs buttons respectively.
Hot Keys #
In Overcharts you have a series of Hot-Keys (key combinations) to place or cancel orders, close or reverse the position, etc.
Before using Hot-Keys in trading, we recommend you carefully read the complete Hot-Keys documentation.
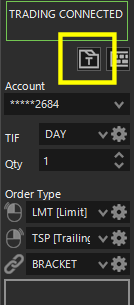
To use Trading Hot-Keys, you need to enable Hot-Keys also in the Trading Panel by pressing ‘keyboard’ button:
Templates #
You can quickly set all trading panel properties using a previously saved template.
Trading Panel settings change according to workspace type and data-feed. For this reason, trading panel templates are divided by Workspace Type + Data-Feed. In other words, if you save a template from a REGULAR workspace, you cannot apply it to a trading panel in a SIMULATOR workspace, or if you save a template from a trading panel connected to a data-feed, you CANNOT apply it to a trading panel connected to a different data-feed.
Templates allow you to configure the trading panel in seconds.
Save a Template #
To save a template, follow these steps:
1. Press Template button on trading panel > Save as
2. You can decide whether to create a new template by defining its name or overwriting an existing one
3. Press OK
Apply a Template #
To apply a template to the trading panel, follow these steps:
1. Press Template button on trading panel > Apply
2. Select the template and press OK
Manage your Templates #
From Template Manager window, you can:
- Rename or Delete a template.
- Import / Export a template.
To access the template manager window, press Template button > Manage.


